|
|
|
 There are three main things you
need to know to be successful at fossicking for sapphires.
There are three main things you
need to know to be successful at fossicking for sapphires.
1. What does a sapphire look like?
2. Where do I look for them?
3. What do I need to find them?
Also, what should I bring and when is the best time to come fossicking at
the Gemfields? Read below.....
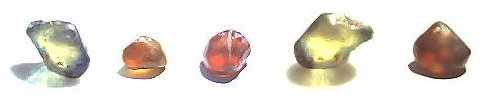
 Sapphires formed in a six-sided crystal formation deep
in the Earth. It is generally believed that they were spewed
out of volcanoes and then tumbled along watercourses. Because
of the tumbling effect on the stones, and the flaws in some of the
crystals, many of the pieces broke apart. Sapphires that are
still in their original six-sided form are often refered to
as a "dog's tooth". Many pieces can be found showing some of
their original sides although on some pieces none of these
sides are clearly visible. Rough sapphire generally looks very
dark but some light colours, like yellow, can be seen without
holding the stone up to the light. Generally, you look for
dark pieces of stone that usually have some sparkle as you
turn them in your hand, and when held up to the light can
show blue, green, yellow or some combination of these.
Sapphires formed in a six-sided crystal formation deep
in the Earth. It is generally believed that they were spewed
out of volcanoes and then tumbled along watercourses. Because
of the tumbling effect on the stones, and the flaws in some of the
crystals, many of the pieces broke apart. Sapphires that are
still in their original six-sided form are often refered to
as a "dog's tooth". Many pieces can be found showing some of
their original sides although on some pieces none of these
sides are clearly visible. Rough sapphire generally looks very
dark but some light colours, like yellow, can be seen without
holding the stone up to the light. Generally, you look for
dark pieces of stone that usually have some sparkle as you
turn them in your hand, and when held up to the light can
show blue, green, yellow or some combination of these.
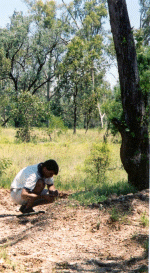
 Sapphires are found in a layer of gravel refered to as
"wash". The depth of the wash layer varies from one area to
another, from being right on the surface to as deep as twenty
meters or more. The Government Fossicking Areas, like Big
Bessie, have been specifically put aside for tourists because
the wash layer is shallow to dig. Although many people have
dug in these areas there are still many spots with original,
untouched ground to dig and also many of the old mullock heaps
are worth sieving again because firstly, everybody misses
stones and secondly, many of the old diggings were sieved without
water which made it extremely hard to find all of the stones.
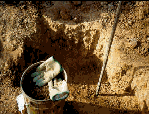
Once the topsoil has been removed to expose the layer of wash,
you dig out and sieve the wash using a willoughby to make
the job much easier. The action of the sieve plunging up and
down in the water brings the heavier stones like sapphires
and zircons to the one spot in the center of the sieve. From
there, the stones are easy to find either by flipping the
sieve upside down on a sorting table or just working through
carefully from one side of the sieve to the other.
Sapphires are found in a layer of gravel refered to as
"wash". The depth of the wash layer varies from one area to
another, from being right on the surface to as deep as twenty
meters or more. The Government Fossicking Areas, like Big
Bessie, have been specifically put aside for tourists because
the wash layer is shallow to dig. Although many people have
dug in these areas there are still many spots with original,
untouched ground to dig and also many of the old mullock heaps
are worth sieving again because firstly, everybody misses
stones and secondly, many of the old diggings were sieved without
water which made it extremely hard to find all of the stones.
Once the topsoil has been removed to expose the layer of wash,
you dig out and sieve the wash using a willoughby to make
the job much easier. The action of the sieve plunging up and
down in the water brings the heavier stones like sapphires
and zircons to the one spot in the center of the sieve. From
there, the stones are easy to find either by flipping the
sieve upside down on a sorting table or just working through
carefully from one side of the sieve to the other.
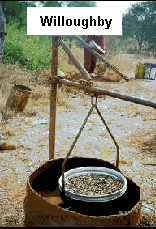 From this, we can gather that some of the essential tools
you will need are a pick and shovel, a sieve, a drum of
water, preferably a willoughby, and as an optional extra,
something for a sorting table (all available for
hire from
Blue Hollow Mine). Also, depending on the ground
you are working, a throwscreen or shaker can be useful to
get rid of excess loose dirt before the sieving process.
If all this is sounding too difficult don't despair! It
is possible to simply go for a walk over the old heaps and
pick up a nice little (or somethimes big) gemstone that
someone else has missed and the rain has exposed in their
old heaps.
From this, we can gather that some of the essential tools
you will need are a pick and shovel, a sieve, a drum of
water, preferably a willoughby, and as an optional extra,
something for a sorting table (all available for
hire from
Blue Hollow Mine). Also, depending on the ground
you are working, a throwscreen or shaker can be useful to
get rid of excess loose dirt before the sieving process.
If all this is sounding too difficult don't despair! It
is possible to simply go for a walk over the old heaps and
pick up a nice little (or somethimes big) gemstone that
someone else has missed and the rain has exposed in their
old heaps.
- Most importantly, WATER. Because of our hot, dry climate you
can very quickly dehydrate. You must drink plenty of water
(not tea, cordial, softdrink, etc, although you could have
these as well) while you are out fossicking.
- Wear old clothes. You will want light clothing that will
protect you from the sun and that won't matter if it gets
very dirty. Covered shoes are much more suitable and
comfortable for fossicking than thongs or sandles.
- You could bring a picnic lunch. It is often more time efficient
to eat your lunch where you are digging. This saves you having to
pack up your gear to go in search of food and gives you more of a
chance to find a gemstone. However, there are many places where
you can buy
take-away food if you prefer.
Most people take advantage of the cooler months from April to September
with the height of the tourist season being from June to August. If you
are planning on staying at a caravan park during the peak season or during
school holidays, you should book ahead to avoid disappointment. There is
always plenty of room for campers in the
designated Fossicking Areas.